thefashiontamer.com Fashion Inspirations

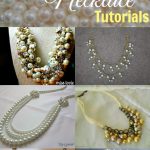
Creating your own unique necklace can be a fun and rewarding DIY project that allows you to express your creativity and personal style. Whether you’re looking to make a statement piece for a special occasion or a simple everyday accessory, crafting your own necklace is easier than you think. With a few basic supplies and a little bit of creativity, you can create a one-of-a-kind necklace that reflects your unique taste and personality. Here is a step-by-step guide to help you create your own unique necklace:
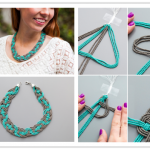
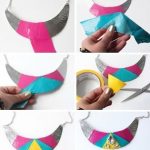
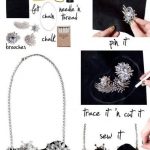
Step 1: Gather Your Supplies The first step in creating your own necklace is to gather all the necessary supplies. You will need a variety of beads, charms, pendants, chains, cords, and findings. Be sure to choose materials that complement each other and fit the style of necklace you want to create. You can find an array of supplies at your local craft store or online.
Step 2: Plan Your Design Before you start assembling your necklace, it’s important to plan out your design. Think about the length of the necklace, the arrangement of beads and charms, and any special features you want to include. Sketching out your design on paper can help you visualize the finished product and make adjustments as needed.
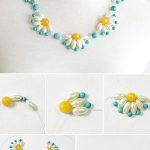
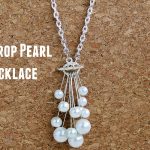
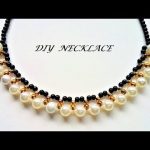
Step 3: String Your Beads Once you have your design planned out, start stringing your beads onto the cord or chain. You can mix and match different types of beads and charms to create a unique look. Experiment with different color combinations and textures to make your necklace stand out. Be sure to leave enough room at the ends of the chain or cord to attach findings and closures.
Step 4: Add Charms and Pendants To add an extra touch of personality to your necklace, consider adding charms or pendants. Charms can be attached directly to the chain or cord, while pendants can be strung onto a jump ring and attached to the necklace. Choose charms and pendants that reflect your interests and style to make your necklace truly unique.
Step 5: Attach Findings and Closures Once you have finished stringing your beads and adding charms, it’s time to attach findings and closures to complete your necklace. Findings, such as jump rings and clasps, are used to connect the ends of the chain or cord and secure the necklace in place. Choose findings that match the style and color of your necklace for a cohesive look.
Step 6: Wear and Enjoy Once you have completed all the steps, your unique necklace is ready to wear and enjoy. Show off your creative flair and personal style by wearing your handmade necklace with pride. Whether you’re dressing up for a special occasion or adding a pop of color to your everyday outfit, your one-of-a-kind necklace is sure to turn heads and spark conversations.
Creating your own unique necklace is a fun and creative way to express yourself and showcase your personal style. By following this step-by-step guide, you can craft a beautiful and personalized necklace that reflects your unique taste and personality. So gather your supplies, plan your design, and get ready to unleash your creativity as you create a stunning handmade necklace that is truly one-of-a-kind.